

StackContacts Connect - User Manual
StackContacts Connect helps you send personalized welcome or follow-up DM messages to your Substack subscribers.

What is StackContacts Connect?
StackContacts Connect is a Chrome extension for newsletter creators. It lets you send direct messages (DMs) — private notes inside Substack — to people who have already subscribed to your publication (your newsletter).
You can personalize each message with the recipient’s name, limit how many people get a message in one run, and skip anyone you’ve already messaged. The extension sends one message at a time with a delay you set, so you stay in control and avoid looking like spam.
Use case examples
I’ve written two posts about how to use StackContacts Connect to automate sending DM messages to your new subscribers.
Here is the first one that covers the basic use cases:

And this is the second one that explains the more advanced use cases and DM campaigns:

If you are wondering how this could work for your situation, please send me a DM or leave a comment below.
Getting started
You need to have a Substack account and a Chrome browser to use this product.
Install the extension
Download StackContacts Connect from the Gumroad store and load it as an unpacked extension in Chrome (e.g. for development). Follow the instructions from Gumroad downlink link.Log in to Substack
In the same Chrome browser, open substack.com and log in to the account that owns the newsletter you want to message from. The extension uses your existing Substack session; it does not ask for your password.Open the extension
Click the StackContacts Connect icon in your Chrome toolbar to open the popup. You should see:Your name and handle (e.g. “Finn Tropy” and “@finntropy”) with your profile picture.
The publication you’re messaging for (e.g. “Finn’sights”). If you have more than one publication, a dropdown lets you choose which one to use.
If you don’t see your name or publication, open Settings (gear icon ⚙ in the popup) and make sure you’re logged in to Substack in that browser.
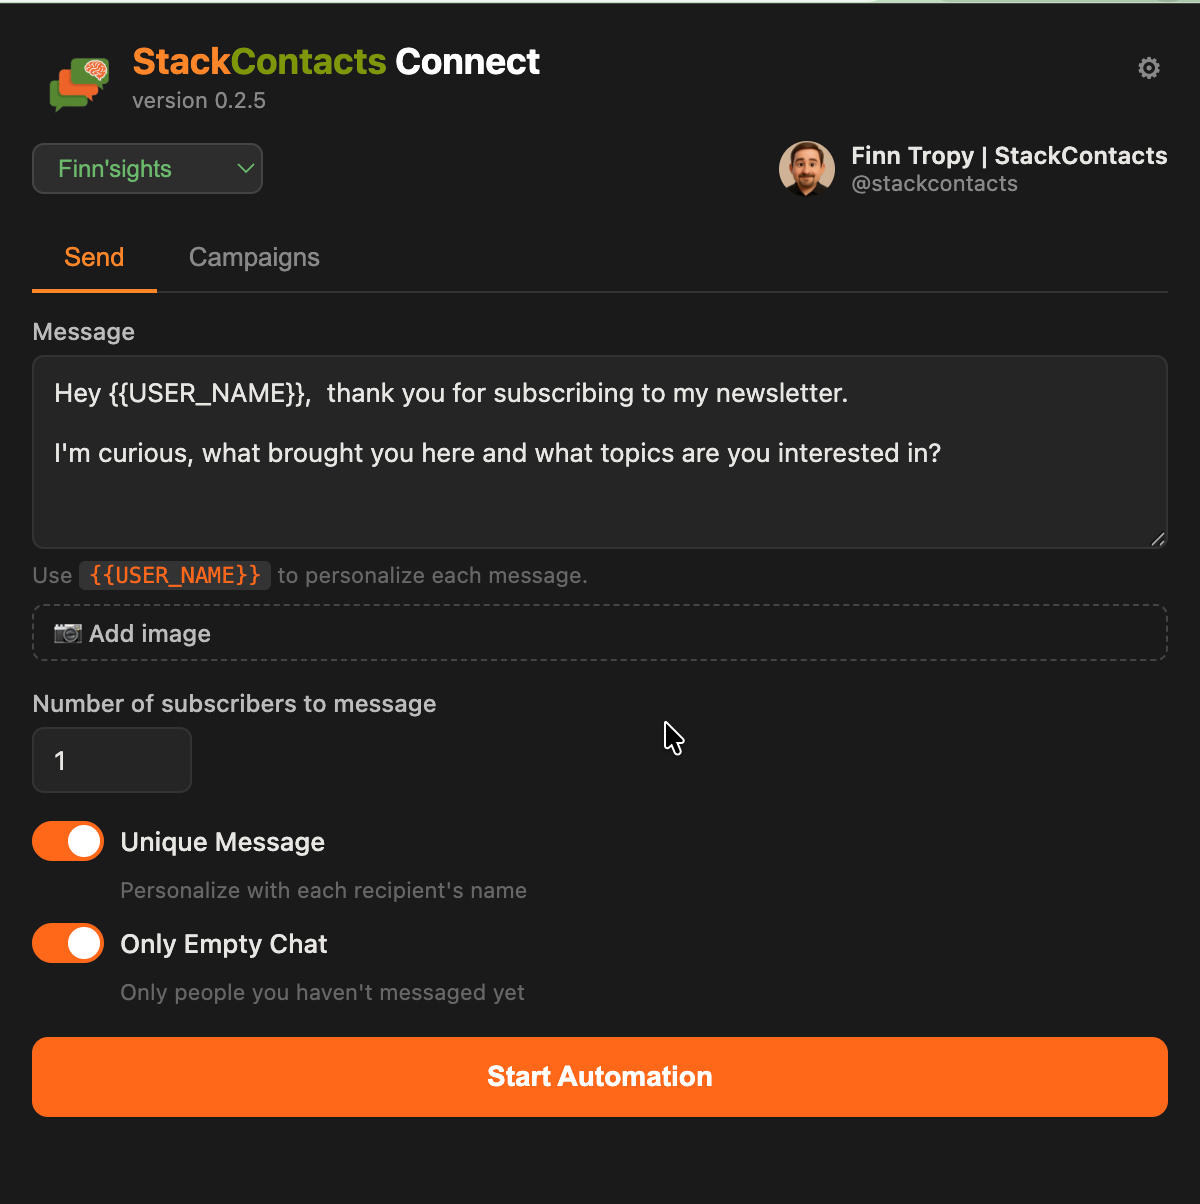
The main popup screen
Publication (top of popup)
If you have one or more publications, you’ll see a dropdown with the publication name (e.g. “Finn’sights”). Use it to choose which newsletter’s subscribers you’re messaging.
If you use a StackContacts data file in Settings instead of the Substack API, you’ll see the publication name with “(from file)” and no dropdown.
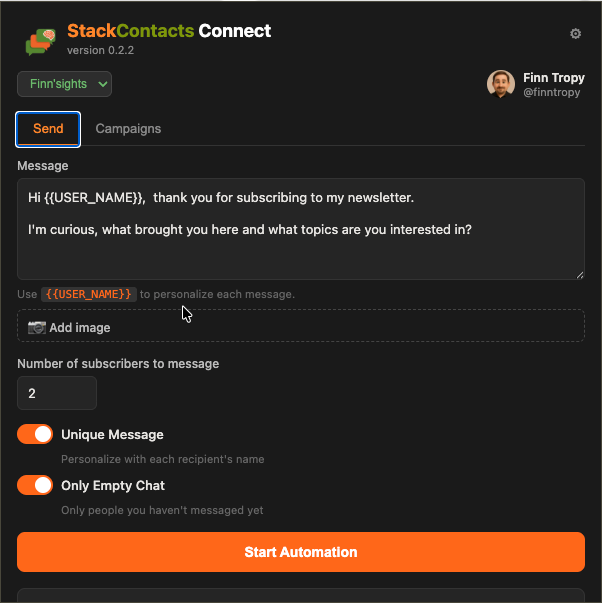
Message
This is the text that will be sent to each selected subscriber.
You can use
{{USER_NAME}}in the message. When Unique Message is on, the extension replaces{{USER_NAME}}with that person’s name (e.g. “Hi Sarah!”).The hint below the box reminds you: “Use
{{USER_NAME}}to personalize each message.”
Number of subscribers to message
A number between 1 and 50. This is the maximum number of DMs the extension will send in one run.
Start small (e.g. 5–10) to test; you can increase it later.
Unique Message
On (recommended): Each person gets a message with their Substack user name where you used
{{USER_NAME}}.Off: Everyone gets the same text;
{{USER_NAME}}is not replaced, so don’t use it.
Image Attachment (optional)
Below the message field, you can attach an image (JPEG, PNG, GIF, or WebP) to your messages. Click the attach button or “Add image” to choose a file.
When attached, a small thumbnail preview appears. Click Remove to clear it.
The same image is sent with every message in the run. If you don’t attach an image, messages are sent as plain text.
Only Empty Chat
On (recommended): The extension only messages people you haven’t already started a chat with. You avoid sending duplicate welcome messages.
Off: The extension may include people you’ve already messaged (useful only in special cases).
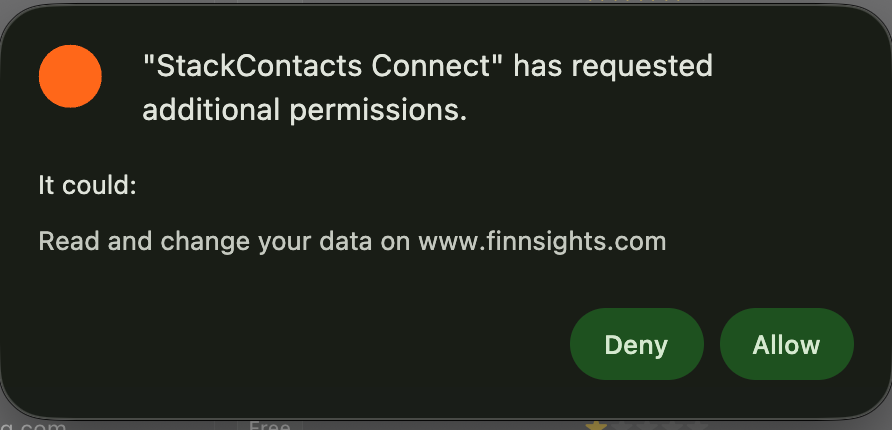
Start Automation
You may see a popup request for additional permissions if you have a custom Substack domain. Allow this permission because the automation requires access to use the Substack API calls for reading your subscribers and posting a Direct Message.
See example below:
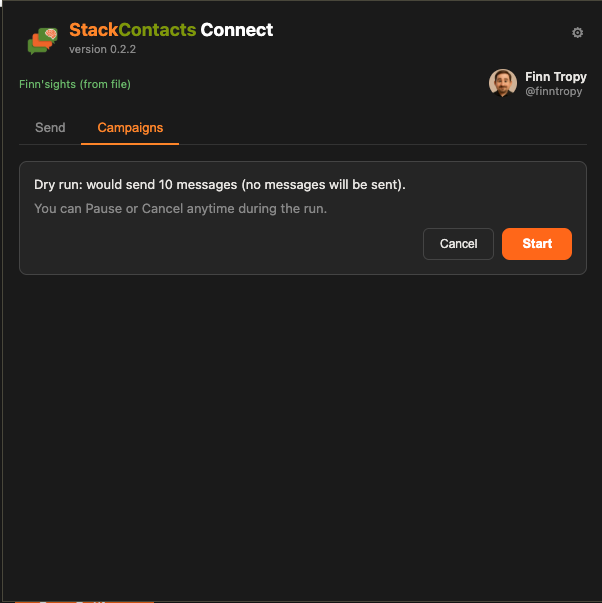
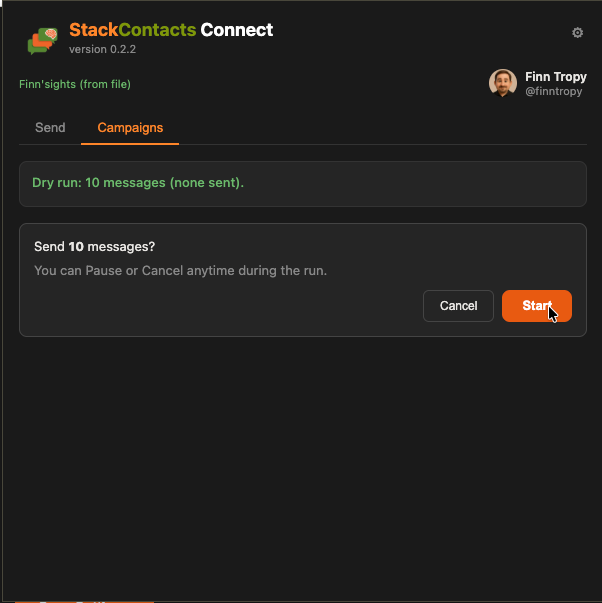
Click Start Automation when you’re ready. A confirmation screen shows how many people will be messaged; click Start to begin or Cancel to abort before sending.
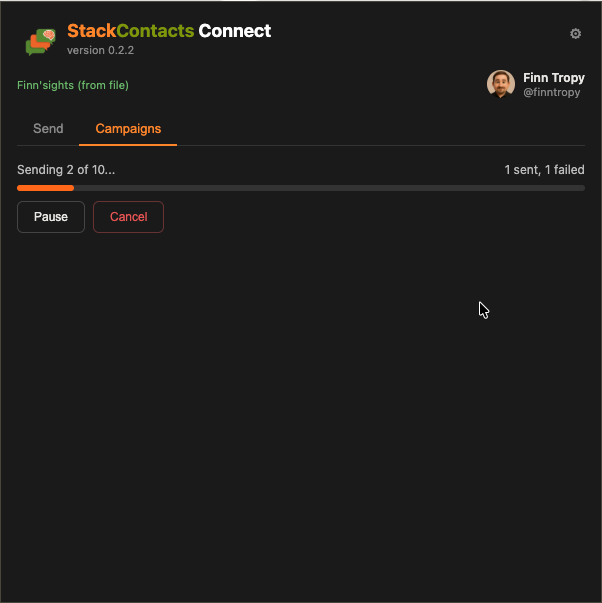
Messages are sent one at a time with the delay you set in Settings.
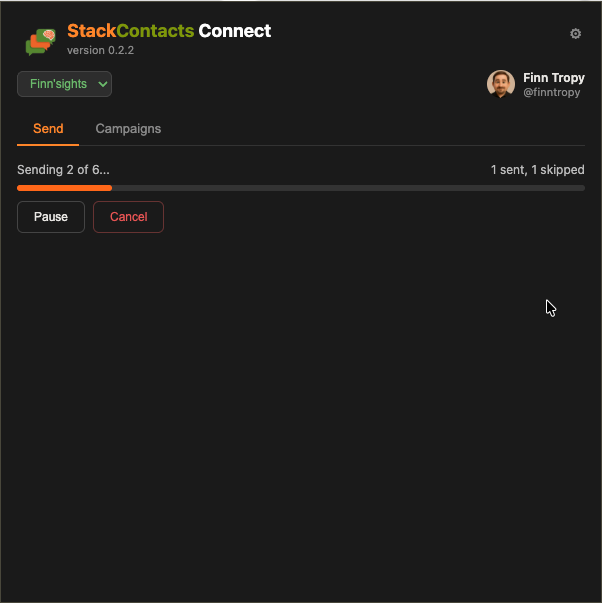
During a run you have two controls:
Pause — temporarily stops after the current message. Click Resume to continue where you left off.
Cancel — stops the run entirely. Any messages already sent stay sent, but no more will be sent. You’ll see a summary of what was sent, skipped, or failed before the run was cancelled.
When the run finishes (or is cancelled), you’ll see how many were sent, skipped, or failed.
Campaigns tab
The Campaigns tab lets you target specific groups of subscribers with personalized messages. You can choose between two data sources: Substack Subscribers (filter by subscriber attributes) or SQL (DuckDB) (custom queries against a StackContacts database file). Campaigns are saved in the extension so you can reuse them.
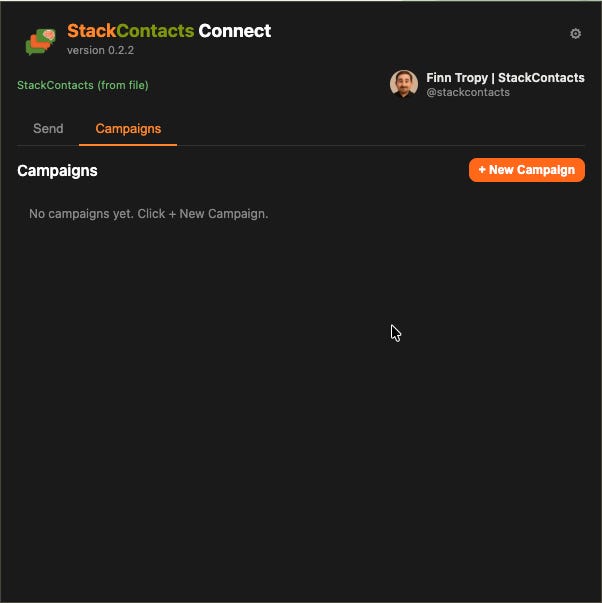
Campaign list
Open the Campaigns tab. You’ll see a list of saved campaigns (name, status, last run) and a + New Campaign button.
Edit opens the campaign editor. Delete removes the campaign after a confirmation.
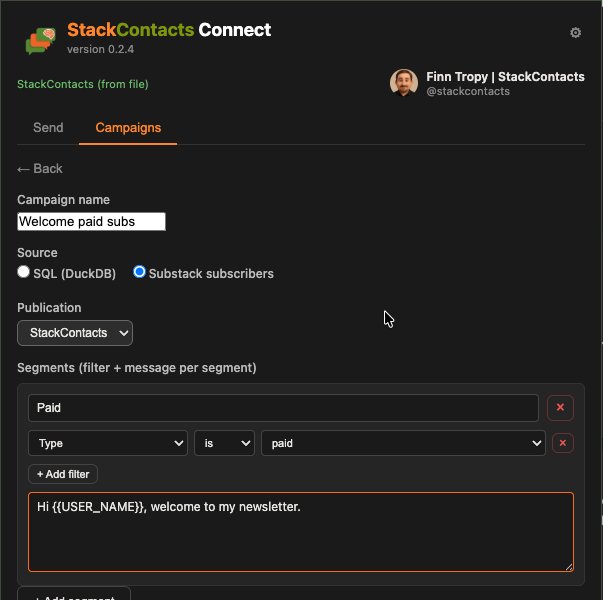
Creating or editing a campaign
Campaign name — e.g. “Welcome new subs” or “Re-engage lurkers.”
Source — Choose your data source:
Substack subscribers — Filter subscribers from Substack directly using segments.
SQL (DuckDB) — Write a custom SQL query against a StackContacts database file.
Substack subscribers source
When you choose Substack subscribers, you build segments. Each segment targets a group of subscribers with a specific message.
Segments — Each segment has three parts:
Segment name — A label for your reference (e.g. “Paid monthly”).
Filters — One or more conditions that narrow down which subscribers to include. All filters within a segment combine with AND logic (subscribers must match every condition).
Message template — The text sent to subscribers who match this segment. Use
{{USER_NAME}}for personalization.
How to add a filter:
Each filter row has three parts:
Column — What to filter on. Pick from 42 options that match the Substack dashboard, including:
Subscriber attributes: Type, Subscription interval, Activity, Country, State/Province
Engagement metrics: Emails opened, Post views, Comments, Shares, Links clicked
Payment data: Revenue, First paid date, Subscription source (free/paid), Expiration date, Stripe plan
Dates: Start date, Cancel date, Paid upgrade date, Last email open
Relation — How to compare. The options depend on the column type:

Value — What to compare against. The input matches the column type: a dropdown for enums, a date picker for dates, a number field for numbers, or a text field for text.

Tips:
Click + Add filter to add another condition to the same segment.
Click the x on a filter row to remove it.
Rows with no column or no value are ignored.
Click + Add segment to target a different group with a different message.
Set a Default message that is used when a segment has no message set.
SQL source (DuckDB)
You need: In Settings > Advanced: StackContacts Data Source, choose your StackContacts database file and select a Publication Schema.
Who should receive this message? — A SQL query that returns one row per recipient. The query must be SELECT only (no UPDATE/DELETE). The first line must start with
SELECTorWITH. Use:{schema}— Replaced with your selected publication schema (e.g.pub_finntropy_substack_com).{N}— Replaced with the max number of rows (from Settings > Campaigns > Max messages per run).
Run Preview — Runs the query and shows a results table. Column names become the tags you can use in the message (e.g. a column
USER_NAMEbecomes{{USER_NAME}}).What should the message say? — Your message template. Use tags like
{{USER_NAME}},{{email}}, or any column name from your query.
Saving and previewing
Save Draft — Saves the campaign and returns to the list.
Preview Messages — Shows a preview table with rendered messages. If you haven’t run a preview yet, it fetches subscribers first.
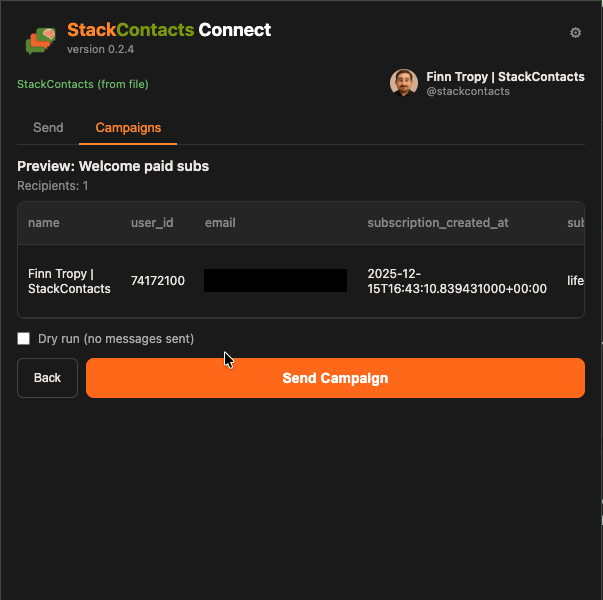

Sending a campaign
From the preview screen you’ll see how many recipients there are and a sample of rendered messages.
Optionally check Dry run (no messages sent) to simulate without sending.
Click Send Campaign, confirm in the dialog, and the extension sends one DM per row (using the same delay as in Settings). You can Pause or Cancel as in the Send tab.
Each run is recorded; the campaign’s “last run” is updated and you can see sent/failed counts.
Example SQL queries (StackContacts database)
These examples match the real StackContacts schema. Use mydb."{schema}". for the publication schema and {N} for the limit. Replace {schema} and {N} in your head when reading; the extension replaces them when you run the query.
New subscribers who don’t have a DM thread yet (welcome message):
SELECT s.user_name AS USER_NAME, s.user_id, s.user_email_address AS email
FROM mydb."{schema}".subscribers_summary s
LEFT JOIN mydb."{schema}".dm_thread_participants p
  ON s.user_id = p.user_id AND p.is_publication = false
WHERE p.thread_id IS NULL
  AND s.user_name IS NOT NULL
ORDER BY s.subscription_created_at DESC
LIMIT {N}
Existing DM threads (follow-up message; needs thread_id so the extension can reply in the same thread):
SELECT p.user_name AS USER_NAME, p.user_id, t.thread_id
FROM mydb."{schema}".dm_threads t
JOIN mydb."{schema}".dm_thread_participants p
  ON t.thread_id = p.thread_id AND p.is_publication = false
WHERE t.is_muted = false
ORDER BY t.last_message_timestamp DESC NULLS LAST
LIMIT {N}
All subscribers (no filter by DM thread; use with care):
SELECT s.user_name AS USER_NAME, s.user_id, s.user_email_address AS email
FROM mydb."{schema}".subscribers_summary s
WHERE s.user_name IS NOT NULL
ORDER BY s.subscription_created_at DESC
LIMIT {N}
Subscribers with a summarized interest (from subscriber_events):
Uses the subscriber_events table (opens, reads, post seen, etc.) to set SUBSCRIBER_INTEREST to the most recent post title they interacted with. Good for messages like:
“Hi {{USER_NAME}}, I noticed that you have interest in {{SUBSCRIBER_INTEREST}}. I’m curious, what brought you here and what other topics are you interested in?”
This version only includes subscribers who have no DM thread yet and who have at least one event with a post title.
Using your Substack username (handle) You can use your Substack handle (the part after @, e.g. finntropy). The publication’s user_id is taken from dm_messages.sender_handle (messages you’ve sent). Use a CTE so the handle appears once; replace yourhandle with your handle (no @):
WITH pub AS (
  SELECT DISTINCT sender_id AS user_id
  FROM mydb."{schema}".dm_messages
  WHERE sender_handle = 'yourhandle'
  LIMIT 1
)
SELECT
  s.user_id,
  s.user_name AS USER_NAME,
  s.user_email_address AS email,
  (SELECT e.post_title
   FROM mydb."{schema}".subscriber_events e
   WHERE e.subscriber_email = s.user_email_address AND e.post_title IS NOT NULL
   ORDER BY e.timestamp DESC
   LIMIT 1) AS SUBSCRIBER_INTEREST
FROM mydb."{schema}".subscribers_summary s
LEFT JOIN (
  SELECT DISTINCT thread_id, user_id
  FROM mydb."{schema}".dm_thread_participants
  WHERE user_id != (SELECT user_id FROM pub)
) p ON s.user_id = p.user_id
LEFT JOIN (
  SELECT DISTINCT p.user_id
  FROM mydb."{schema}".dm_thread_participants p
  INNER JOIN (
    SELECT DISTINCT thread_id
    FROM mydb."{schema}".dm_messages
    WHERE sender_id = (SELECT user_id FROM pub)
  ) t ON p.thread_id = t.thread_id
  WHERE p.user_id != (SELECT user_id FROM pub)
) sent ON s.user_id = sent.user_id
WHERE p.thread_id IS NULL
  AND sent.user_id IS NULL
  AND s.user_name IS NOT NULL
  AND EXISTS (
    SELECT 1 FROM mydb."{schema}".subscriber_events e
    WHERE e.subscriber_email = s.user_email_address AND e.post_title IS NOT NULL
  )
ORDER BY s.subscription_created_at DESC
LIMIT {N}
This requires at least one message sent by you in dm_messages so that sender_handle is set. If you have no DMs yet, use the numeric user_id version above.
Required columns: Each row must include either user_id (to start a new DM) or thread_id (to reply in an existing thread). Other columns (e.g. USER_NAME, email) are for your template tags.
Settings > Campaigns
Max messages per run — Cap on how many rows from the query are used in one send (e.g. 100).
Require preview before send — You must run Preview before Send Campaign.
Only allow SELECT (SQL safety) — Campaign SQL must be SELECT-only; the extension blocks UPDATE, DELETE, etc.
Settings (gear icon)
Open Settings from the gear icon ⚙ in the popup.
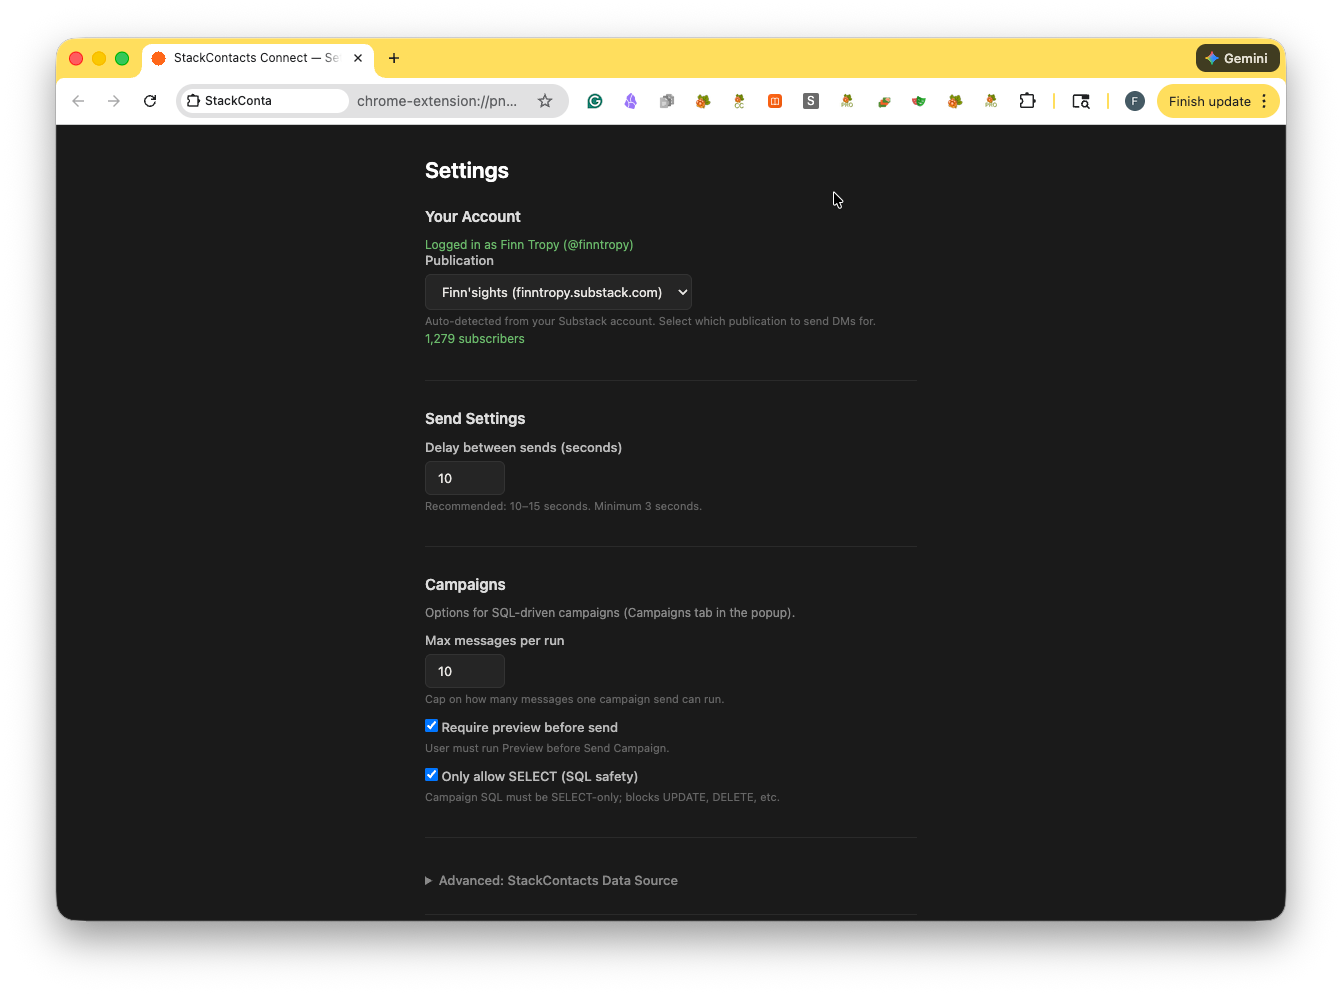
Your Account
The extension auto-detects your Substack account and your publications. You’ll see “Logged in as [Your Name] (@yourhandle)” when it works.
If you have more than one publication, use the Publication dropdown here (or in the popup) to choose which publication’s subscribers to use for the list.
If auto-detection fails, you can enter your Publication URL manually (e.g.
yourname.substack.com).
Send Settings
Delay between sends (seconds): How many seconds to wait between each DM. We recommend 10-15 seconds. The minimum is 3.
A higher delay is more respectful to Substack and reduces the chance of looking like spam.
Campaigns
Max messages per run — Maximum number of recipients per campaign send (e.g. 100).
Require preview before send — When on, you must run Run Preview (and see the results table) before Send Campaign.
Only allow SELECT (SQL safety) — When on, campaign SQL must be SELECT-only; other statements are blocked.
Advanced: StackContacts Data Source
This section is optional. Use it only if you use the StackContacts tool and have an export file (e.g. a StackContacts database file) that you want to use instead of the built-in Substack subscriber list.
When a StackContacts file is configured, the extension uses that data source instead of the Substack API. You can choose a Publication Schema from the file; only publications that match your current Substack account are shown.
If you don’t use StackContacts, you can ignore this section.
Best practices for sending DMs to new subscribers
Only message your own subscribers. The extension is for people who have already subscribed to your publication. Don’t use it for cold outreach or people who haven’t opted in.
Keep messages short and useful. A brief welcome, a thank-you, or one helpful link is enough. Avoid long or salesy copy.
Use “Only Empty Chat” when welcoming new subscribers so you don’t message the same person twice.
Respect the delay. Keep the delay at 10-15 seconds (or higher). Don’t set it to the minimum unless you have a good reason.
Cap the number per run. Start with 5-10 messages to test; then increase if you’re happy with the result. Avoid very large batches in one go.
You trigger each run. The extension does not send messages on its own. You click Start Automation each time. That keeps you in control and aligned with how Substack expects tools to behave.
Troubleshooting
“Not logged in” or “Can’t reach Substack”
Log in to Substack in this browser and try again. Check your internet connection. If it still fails, open Settings and see if the extension can detect your account.Wrong publication or no subscribers
Open the popup or Settings and check which publication is selected (dropdown or “from file”). Make sure that publication has subscribers. If you use the Substack API, the extension will show how many subscribers it found when you pick a publication in Settings.Messages not sending or errors during a run
Check that the message is not empty and that Number of subscribers to message is at least 1. If Only Empty Chat is on, some candidates may be skipped because you’ve already messaged them; the final count will show sent, skipped, and failed.Campaigns: “Load database in Settings” or “Table does not exist”
The Campaigns tab uses the same StackContacts file and publication schema as the Send tab. In Settings > Advanced: StackContacts Data Source, choose your database file and select a Publication Schema. In your campaign SQL, usemydb."{schema}".table_name(the extension replaces{schema}with the selected schema). Table names must match your file (e.g.subscribers_summary,dm_threads,dm_thread_participants).
If you have any questions about this product or have ideas who to make it better, leave a comment or send me a DM.
— Finn
Hello Finn
I like the sound of this but I feel overwhelmed by the technicalities of it all. First question, what if you don't know the names of your subscribers but only have emails? How do you find their names?